Friday, May 31, 2013

Sew-A-Long Day 6

Pockets...

There are three types of pockets in this bag by byAnnie! and one that I decided to do on my own!

Zippered Pocket

Slot pockets

Vinyl Pocket
Exterior pouch pocket


Zippered Pocket.

This pocket was not in byAnnie's pattern. Since I am now working on my second bag, It was time for me to add my own touches.  I wanted to put a zippered pocket somewhere, and this seemed to be the perfect spot... I found this video on how to put a zipper in a pocket. It was very different than the way I usually would have done it so I gave it a try. Go and watch it... I will wait!

Karen Comstock from QuiltTricks
 explains how to put a zipper in a pocket.

One thing I always do when I want the stop of the zipper just inside my seam line as shown in the video, is to mark my 1/4 inch line and make sure I place the stop about an 1/8th of an inch in from the line. That way I always know I won't be hitting it with my needle. 
Placing the zipper stop inside the 1/4 inch seam allowance.

I don't have a walking foot for my Bernina 830, it has Dual Feed, which is great for the things I use it for. (I do all my quilting on a Long Arm so I have no need for a walking foot!) I just used my Open Toe Foot on my 830 and it worked perfectly for me. 


I liked this technique and will try it again on some other projects. I did rip a few times because I sewed too close to the zipper, but I will know better next time.

I made bar tacks at both ends of the zipper. I like to get the open end at the zipper stop closed to make it easier for me to sew the pieces together later.


Zipped pocket.
My pocket had some issues, I made my top piece 2", and it could have been 1 1/4"... that way my zipper would have been higher up in the pocket. Once again... this bag is tiny so this little zipped pocket will only hold a Loonie or a Toonie  or two. 

I attached my zipped pocket to a Slot Pocket piece with stabilizer on it, but I wouldn't have had to do that I don't think if I had remembered to stabilize the pocket pieces.

Slot Pockets

Slot Pockets are very handy for credit cards, customer appreciation cards, small pictures and they are simple to do.

I have a very inexpensive iron that I purchased just for sticky stuff.
 I mark it so no one uses it on their fabrics with out a pressing sheet.
One of my little tricks is to always cut the interfacing an 1/8 of an inch smaller so when you press it you don't have to worry about the sticky stuff on your iron or ironing board.
Interfaced piece.
Interfacing was cut 1/4" smaller than pattern piece.

 Each pattern piece is cut, pressed, folded in half and top stitched. EASY!

Vinyl Pocket.

This little pocket will be a great little pocket for the girls to put pictures of their latest dream boyfriend. (Not sure if it's still Justin Beeber or not!  LOL). Its also a great pocket for your drivers license or any other ID you like to carry with you.

Video tutorial from byAnnie!
I am not going to pretend I know anything about sewing on Vinyl, never mind binding it so I am going to send you over to Annie... she has a great video tutorial at her site, just for those of us who have no clue how to get this sticky stuff through our machine!

I will wait while you go watch!...


And that is all there is to that...
Vinyl pocket attached!

Exterior Pouch Pocket

If you have been following along, earlier I mentioned that while reading the pattern I had some concerns about 1 part of it. This was it... Turns out it was very simple!

The exterior pocket starts out like the slot pockets. You interface the pattern piece, fold it in half, then top stitch.
I just use my roller to press.
Now you need to stitch again to make a tunnel for your elastic. I like to back stitch at each end of this stitching to make sure this seam doesn't come apart while you are stretching the fabric. 
I love the Frixion pens for marking lines where I will be sewing.
They iron right out when I am done with them.
 When I am sewing lines of stitching that I know will be used for elastic, I usually use a very narrow zigzag, sewn at my normal stitch length... 2.0 on my machine. 

The next part is adding the Velcro piece. I always use a small zig zag to sew around the edge and always sew twice. Put the extra piece on top of it (you will use it later) before you move to the next step. You know your going to lose it if you don't!!


The next step is the tricky part. 

First you want to cut out small corners at the bottom of the piece

Cut through both layers.

 Next you want to separate the layers and... 

Separate layers.

fold each corner, right sides together and...

Fold corners right sides together

stitch...

All four corners stitched.

Tuck corners into each other to form pouch, and...


Add Elastic and...

A bodkin or a safety pin works well for this step.


the pouch pocket is done and ready to attach.


OK... that's it for today. I will be back on Monday with the next step!

Note... I just need to keep reminding you that I am not employed by any of the companies I have talked about today. Just a happy customer!


I love these little snap pouches.
They are great for carrying small objects in one of your purses.
But, I am afraid, they will not fit into this bag!


Wednesday, May 29, 2013

Sew-a-long day 5

Making Straps

Finally, our first day of sewing!  Actually we will be doing a little sewing and a ton of ironing!

Today's topic will be straps.  There are all kinds of straps you can make for bags, but the straps we are making are only 1/2" finished ( remember... the purse/wallet pattern from byAnnie is very, very small!).
  1.  CUTTING... You may remember on our last sew along day we talked about "dog leg cuts". Well this is definitely a time when you want to take special care in your cutting.  You want your straps to be STRAIGHT, so take special care when you cut them.  If I had my choice, I would almost always cut my straps from the LOF so that they would have very little stretch. I love nice sturdy handles.
  2. INTERFACING...is a must. I like to use a heavy weight fusible interfacing on the wrong side of quilting cottons when I make straps for a bag. I want the handles to last as long as my bag, and this will help!
  3. IRONING... accurate ironing will make your straps look more professional. Sometimes I see students iron their straps and the come out all wavy.  I always recommend a dry iron.  Steam will cause your fabric to stretch especially if they haven't been cut right on grain...( which I have to say is almost impossible unless you rip your fabric)
  4. STITCHING... Straight stitching is the final perfect finish for a strap. If you have trouble sewing straight lines, a long zig zag or a decorative stitch can often hide any little glitches, not to mention they look nice on some straps. (These straps are way too narrow, so I have some hints to help you with your straight stitching.)
The thing I like about the byAnnie patterns is that she likes to have you get all your parts made at the beginning so you can steadily sew to the finish line, with straps, pockets, tabs, and zipper pulls ready to go beforehand.


Here's my steps to successful handles.  

( straps are cut, we did that last time!)

Usually when you make straps you will have to cut several  strips to get one strip long enough to make your strap. I like to join my strips the same way I join my binding strips...


Once the strips are joined, I take them to the ironing board and press the seams open. Then I trim the allowance down to about 1/8".

I like this method because it is much easier to open the seams when the seam allowance is big compared to trimming them down 1/8" and then trying to open them! Also,  The smaller seam allowance takes away a lot of the bulk in the folded strap.

Joined Strip

Press seam allowance open before cutting
Opened seam

Trim to 18" or less

Seam falls open after trimming. Press well!


Now these next steps add a few extra moments to your strap making time, but I am never disappointed with the final result so it is worth it!

The next step is to add your interfacing.

 I try to be very careful with this cutting step as well. If the interfacing has a "dogs leg" in it, it will drag your fabric into the same shape. It's really important to use the same care in cutting your interfacing that you took with your  fabric.


My method for attaching the iron on interfacing, takes a little more time,but tends to be very accurate. 

With right sides together I fold and press the interfacing using my wooden roller pressed.(mountain)

I love this little wooden roller for lots of things.
In this case it is necessary, but any wooden  pressing tool would work.

Press the interfacing right sides together to form a crisp fold on the right side. (Mountain)
Make sure you don't use your iron on this!
I might have to do a tutorial on how to get all that sticky stuff off it!

With wrong sides together I press my strap strip together, using my iron. (Valley)


Press the strip wrong sides together to form a soft fold on the wrong side. (valley)

I carefully place my "mountain" fold of my interfacing into my "valley" fold of my strap. This way my interfacing is absolutely centred on my strap!  This works perfectly when your interfacing is not cut as wide as your strap.
Matching the "Mountain" to the "Valley" makes it easy
 to correctly place your interfacing on your strip.

Once the interfacing is pressed to the strap you are ready to fold.

Each raw edge is pressed to the centre fold.

I like to press one side at a time. Because of the interfacing and fabric,
 you have to apply the heat a little longer
and the fabric gets hot and so do my fingers.
I sometimes like to use a bias tape maker, but usually I have this job done before I can find the bias tape maker. With something this small, I usually press one side at a time, so the fabric has time to cool between sides.
This is a 1" bias binder.
Next, the now 1 inch strap is folded in half again, pressed, and ready to sew.

I like to use a dab of Elmer's School or Washable Glue, to hold the two sides together neatly as I press. This way no pins are needed when I am ready to sew!
I am well known as the glue lady, because I have lots of uses for
Elmers Washable or School Glue.
I buy it in every shape container available,
and this is one of my favorites.
Your straps are ready to sew!
Sewing these tiny straps can be difficult, but I use an edge foot or blind hem foot (Foot 10 for Bernina users), to keep the edges in line as I sew down each side with a slightly longer than normal stitch... 3.0 usually works nicely.   I also like a 30 weight thread ( I used Superior Sew Fine #30) for this step, with a Superior Titanium Topstitch size 16 needle.


The edge foot keeps your fabric edge in place.
Move your needle over to the right spot to sew just off the edge.

The finished strap, front and back. I love the look of the 3.0 stitch length.


Ok... the straps are made and we are ready for the next step. See you Friday!

Note... I do not work for byAnnie, Elmers Glue or Superior, or Bernina just in case you have forgotten!


Monday, May 27, 2013

Sew-a-long day 4

Today I am going to talk about cutting. 

Cutting for the byAnnie bag is easy. There is a layout provided and I found it easiest just to follow it. The cutting went very smoothly. If you are sewing-a-long let me know if you need any help with this step, but I am sure you will find it as simple as I did
Example
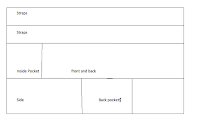
Above you will see a sample of a cutting layout. (I just made it up so if you think it is a little wonky, it is!) The advantages of a layout is that the pieces are marked and usually have the size of each cut shown clearly on the layout. The other thing is that it gives you an example of the best use of your fabric. I sometimes draw a little cutting diagram for myself using grid paper if I am not sure I have enough fabric. Nothing more frustrating than thinking you have enough and finding out later that you are one 2 1/2" square short!


But before I do my little  cutting tutorial there is something important I think everyone needs to know (or be reminded of).

WOF and LOF (width of fabric and length of fabric)

These little acronyms often confuse newbies and I like to get that out of the way first thing when I start a cutting tutorial.

Next... how in the world do you tell the difference. When the selvage is still on, its easy.... selvage to selvage is the WOF. But if the selvage is gone... its also easy to figure out with the stretch test.

The LOF has relatively no stretch.

LOF ( no stretch)

The WOF will stretch a little (sometimes a lot) but not as much as bias (which we are not talking about today)

WOF  ( stretch)
Mostly we cut across the width of fabric. It is important to follow the proper steps to get a nice cut without a "dog leg" effect happening.

"Dogs leg cut"
Believe it or not that little bend in the strip above, can easily be avoided, but sometimes even when you think you have done everything right they happen! (or at least they do to me!) Here are the steps that will help you avoid a "dogs leg cut".

A. Make sure you have a sharp blade in your rotary cutter. Dull blades and those with minor nicks in them can be sharpened with a blade sharpener. I think that is one of the most important investments I have made. Your blade will last you 3 times longer if you keep it sharp.

B. Press your fabric well! Especially that fold line in the center of your fabric. That fold is never a true center so get rid of it! A little vinegar in a spray bottle will help if it doesn't easily iron out. 

          I always tell my students about the time I went to the factory to purchase some fabric and I was watching an employee,  fold the fabric onto the cardboard bolt. If you could have seen the way he pulled and tugged at that fabric to get on the bolt, you would realize and always remember that, the fold line in unwashed fabric has nothing to do with STRAIGHT!

C. Manipulate your fabric so you can straighten the cut edges

I never know how to write about this. It sounds very confusing when I do.  But here goes.

     1. Begin by folding fabric together matching the selvage edges. (WOF) the cut edges will most likely be misaligned, but don't worry about that, you will be cutting them straight.

     2. Look down at the fabric and make sure it is smooth not "wrinkled" to avoid "The Dogs Leg Cut"
Good!
not good! "Dogs leg cut" ahead!

     3. Lay the folded fabric on your mat and fold your fabric again... selvages at the top. Now you should have a piece about 11"
     4. To square off edge, (left edge for right handed cutters and right edge if you are left handed) place a 6" square (or larger) even with the bottom fold, with left edge covering all 4 layers of fabric or about 1/2" from all uneven edges. 


     5. Butt your rectangular ruler tightly up against your square.


     6. Move the square out of the way and cut off the jagged edge under your rectangular ruler.

I find this method best because you don't have to move your fabric after squaring. You are ready to cut your strips!


The rules for cutting...

  1. MEASURE TWICE, CUT ONCE!
  2. ALWAYS MOVE YOUR CUTTER AWAY FROM YOURSELF.  Listen for gasps from teachers if you even think about cutting towards yourself!
  3. KEEP YOUR FINGERS AWAY FROM THE CUTTING EDGE OF THE RULER! hmmmm that makes good sense, but not everyone is paying attention! Place your left hand in a tripod over the center of the ruler. (see picture below)
  4. Exert firm and even pressure. I always jump all over the sawing method! It tells me two things. The person didn't have a very good teacher or their blade is dull! Keep your rotary cutter at a 45 degree angle to the fabric. Leaning your cutter away from your ruler will give you uneven cuts. 
  5. Cutting is easiest when you stand up. I have tried it while sitting and I don't feel like I get the same pressure. Some people do it all the time... must take practice. 
  6. Lean over your fabric. It really makes a difference.
  7. It is best not to use the lines on your mat. I like to use them to align the cut edges of my fabric on, but I mostly turn my mat over and use the back so the lines don't confuse me... I do get confused easily!

Tripod Method
And notice, my pointy finger is on the top of
my rotary cutter, pointing in the direction I am cutting.
There are little finger ridges there, to hold your finger firmly in place.
This is the proper way to hold a rotary cutter.


 OK, so go cut something!  Hopefully you are working on our little wallet, but if not let me know what you were cutting today. These things are way more interesting with comments!

Another Nickel Bucket tote.
Wednesday we will talk about straps... see you then!