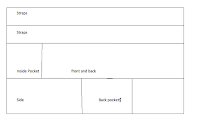
Cutting for the byAnnie bag is easy. There is a layout provided and I found it easiest just to follow it. The cutting went very smoothly. If you are sewing-a-long let me know if you need any help with this step, but I am sure you will find it as simple as I did
 |
| Example |
Above you will see a sample of a cutting layout. (I just made it up so if you think it is a little wonky, it is!) The advantages of a layout is that the pieces are marked and usually have the size of each cut shown clearly on the layout. The other thing is that it gives you an example of the best use of your fabric. I sometimes draw a little cutting diagram for myself using grid paper if I am not sure I have enough fabric. Nothing more frustrating than thinking you have enough and finding out later that you are one 2 1/2" square short!
WOF and LOF (width of fabric and length of fabric)
These little acronyms often confuse newbies and I like to get that out of the way first thing when I start a cutting tutorial.
Next... how in the world do you tell the difference. When the selvage is still on, its easy.... selvage to selvage is the WOF. But if the selvage is gone... its also easy to figure out with the stretch test.
The LOF has relatively no stretch.
 |
| LOF ( no stretch) |
The WOF will stretch a little (sometimes a lot) but not as much as bias (which we are not talking about today)
 |
| WOF ( stretch) |
 |
| "Dogs leg cut" |
Believe it or not that little bend in the strip above, can easily be avoided, but sometimes even when you think you have done everything right they happen! (or at least they do to me!) Here are the steps that will help you avoid a "dogs leg cut".
A. Make sure you have a sharp blade in your rotary cutter. Dull blades and those with minor nicks in them can be sharpened with a blade sharpener. I think that is one of the most important investments I have made. Your blade will last you 3 times longer if you keep it sharp.
B. Press your fabric well! Especially that fold line in the center of your fabric. That fold is never a true center so get rid of it! A little vinegar in a spray bottle will help if it doesn't easily iron out.
I always tell my students about the time I went to the factory to purchase some fabric and I was watching an employee, fold the fabric onto the cardboard bolt. If you could have seen the way he pulled and tugged at that fabric to get on the bolt, you would realize and always remember that, the fold line in unwashed fabric has nothing to do with STRAIGHT!
C. Manipulate your fabric so you can straighten the cut edges.
I never know how to write about this. It sounds very confusing when I do. But here goes.
1. Begin by folding fabric together matching the selvage edges. (WOF) the cut edges will most likely be misaligned, but don't worry about that, you will be cutting them straight.
2. Look down at the fabric and make sure it is smooth not "wrinkled" to avoid "The Dogs Leg Cut"
 |
| not good! "Dogs leg cut" ahead! |
3. Lay the folded fabric on your mat and fold your fabric again... selvages at the top. Now you should have a piece about 11" 4. To square off edge, (left edge for right handed cutters and right edge if you are left handed) place a 6" square (or larger) even with the bottom fold, with left edge covering all 4 layers of fabric or about 1/2" from all uneven edges.
5. Butt your rectangular ruler tightly up against your square.
6. Move the square out of the way and cut off the jagged edge under your rectangular ruler.
I find this method best because you don't have to move your fabric after squaring. You are ready to cut your strips!
The rules for cutting...
OK, so go cut something! Hopefully you are working on our little wallet, but if not let me know what you were cutting today. These things are way more interesting with comments!
Wednesday we will talk about straps... see you then!
The rules for cutting...
- MEASURE TWICE, CUT ONCE!
- ALWAYS MOVE YOUR CUTTER AWAY FROM YOURSELF. Listen for gasps from teachers if you even think about cutting towards yourself!
- KEEP YOUR FINGERS AWAY FROM THE CUTTING EDGE OF THE RULER! hmmmm that makes good sense, but not everyone is paying attention! Place your left hand in a tripod over the center of the ruler. (see picture below)
- Exert firm and even pressure. I always jump all over the sawing method! It tells me two things. The person didn't have a very good teacher or their blade is dull! Keep your rotary cutter at a 45 degree angle to the fabric. Leaning your cutter away from your ruler will give you uneven cuts.
- Cutting is easiest when you stand up. I have tried it while sitting and I don't feel like I get the same pressure. Some people do it all the time... must take practice.
- Lean over your fabric. It really makes a difference.
- It is best not to use the lines on your mat. I like to use them to align the cut edges of my fabric on, but I mostly turn my mat over and use the back so the lines don't confuse me... I do get confused easily!
| Another Nickel Bucket tote. |


No comments:
Post a Comment